Post-Install Tips & Tricks for Ubuntu 16.04

1. Install Media Codecs

Due to legal issues Ubuntu does not come with media codecs pre-installed, which are needed to play most audio and video formats. Installing the required codecs is straightforward:
sudo apt-get install ubuntu-restricted-extras

1.1 Install unrestricted version of libavcodec 

sudo apt-get install libavcodec-extra

2. Install Java

Most likely you will only require the Java browser plugin and OpenJRE.
sudo apt install icedtea-8-plugin openjdk-8-jre

3. Adobe Flash on Ubuntu

Unfortunately Flash is still needed for many web applications.
sudo apt-get install flashplugin-installer
Alternatively you can use chromium (recommended!).
sudo apt-get install chromium-browser chromium-browser-l10n chromium-codecs-ffmpeg

4. Install Linux Graphics Drivers 

AMD users will experience a drop in performance because the AMD driver is not supported as of now (June 2016) in Ubuntu 16.04. So think twice before upgrading if you are playing games or performing GPU-intensive work.
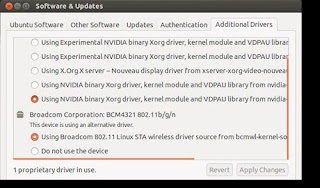
  • 1) Open Software & Updates from the Unity Dash
  • 2) Click on the Additional Drivers tab 
  • 3) Follow on-screen instructions
software & updates ubuntu 16.04

5. Install a System Cleaner

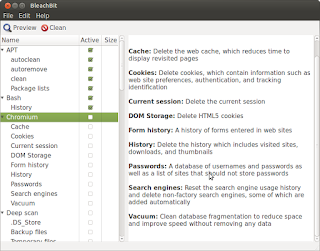
BleachBit is an excellent open-source tool to keep your caches clean and perform some other essential housekeeping from time to time.
sudo apt-get install bleachbit
system cleaner ubuntu 16.04

Comments

  1. Step 1.1 is not needed as installing restricted extras installs libavcodec-extra as well as the flash installer in step 3

    ReplyDelete
  2. I've been dual-booting Windows and Ubuntu for almost ten years now. Unfortunately, after installing Windows 10, the GRUB boot loader that allows you to choose between Windows and Ubuntu disappeared from my computers, so I was forced to either automatically boot into Windows 10 at start-up or enter the BIOS and choose to boot into Ubuntu from there.
    However, after installing the windows 10 Anniversary Update (1607), not only was the GRUB boot loader missing, but the option to boot into Ubuntu disappeared from the BIOS as well. There was essentially no way to boot into Ubuntu, even though the computer still showed that the Ubuntu partition was “healthy”.
    If you are experiencing this same problem, here is how to restore normal functioning of the GRUB boot loader:
    First, go into the Windows 10 Command Prompt (Administrator) this way: Click on the “Windows” logo at the bottom left-hand side of the screen. Go down to Windows System>Right-click “Command Prompt”> More>Run as administrator
    Enter (copy/paste) the following: bcdedit /set {bootmgr} path \EFI\ubuntu\grubx64.efi

    ReplyDelete

Post a Comment

Popular posts from this blog

OsmocomBB - Hardware and Software Setup - Tutorial (Motorola C118)

OsmocomBB is an Open Source GSM Baseband software implementation. By using the sofware on a compatible phone (e.g. Motorola C118), you are able to make and receive phone calls, send and receive SMS, etc. based on Free Software only.       Hardware PL2303HX USB Serial To RS232 TTL Chip 2.5 mm audio jack Motorola C118 (E88) This is a typical pin-out of a 2.5 mm audio jack: L (Left Signal) Tip 1 Green R (Right Signal) Ring 2 Red GND (Ground) Sleeve 3 Bare Copper You need to soldier the 2.5mm audio jack to the USB Serial To RS232 TTL Chip, whereas TxD is at the tip of the plug RxD is at the middle contact GND is the outer contact  Software Connect the phone to your PC and check if it is being recognized. dmesg | grep tty user@user:~$ dmesg | grep tty [    0.000000] console [tty0] enabled [ 6522.143379] usb 3-2: pl2303 converter now attached to ttyUSB0 To make sure everything is working, install cu and c

Scid vs PC installation guide - Ubuntu (Mint, Debian etc.)

Scid vs PC Scid vs PC is definitely the best and most comprehensive chess software for Linux.  Unfortunately I struggled quite a bit to get it up and running. Before I start: You might prefer to watch the video. Otherwise keep on reading. Open a terminal and execute the following commands sudo apt-get install auto-apt build-essential sudo auto-apt update-local sudo auto-apt update sudo auto-apt updatedb Now make sure you got both tcl8.5-dev and tk8.5-dev installed sudo apt-get install tcl8.5-dev tcl8.5 sudo apt-get install tk8.5-dev tk8.5 Some users are reporting problems on Ubuntu 14.04. sudo apt-get install tcl8.6-dev tcl8.6 sudo apt-get install tk8.6-dev tk8.6 libgcj15-dev The 'x' refers to the current release: e.g. 4.9.tgz download scid vs pc: http://sourceforge.net/projects/scidvspc/files/source/scid_vs_pc-4.9.tgz/download tar -xzf scid_vs_pc-4.xx.tgz cd scid_vs_pc-4.x sudo auto-apt run ./configure sudo auto-apt run make sudo auto-apt run make install

Automatically Reconnect WIFI (Debian, Ubuntu etc.)

The Problem For several reason I do not have access to LAN and thus have to rely on WIFI for my mining rigs. It is fine for most of the time, but the shit hits the fan, when the connection drops for one reason or another. The Solution #!/bin/bash wlan=`/sbin/ifconfig wlan1 | grep inet\ addr | wc -l` if [ $wlan -eq 0 ]; then service network-manager restart else echo WIFI IS UP fi Note: It's either wlan0 or wlan1. Check with sudo ifconfig . Save the script and make it executable. sudo chmod +x filename.sh Now there are several ways of making sure that our script is being executed every x minutes. The easiest way of accomplishing that I think is by using the command watch . sudo su watch -n 600 sh filename.sh What it does is execute our filename.sh script every 600 seconds. Or you implement a so called cron job   sudo crontab -e Add the following PATH=/usr/sbin:/usr/bin:/sbin:/bin */5 * * * * sh /home/username/filename.sh */5 * * * * means that