Banana Pi - Raspberry Pi Upgraded


Given that I finally received my Banana Pi, it is time for a little review of the Chinese Raspberry Pi "competitor". Before I tell you about my first experiences with the board, let's have a quick look at its hardware specs and how they compare to the newly released Raspberry Model B +.


Hardware


The first thing that sticks out is the Banana Pi's much faster dual-core, Cortex-A7-based Allwinner A20 system-on-chip running at 1GHz, which definitely beats the Raspberry's "well-known" 700MHz, ARM11-based Broadcom BCM2835 processor.

The Banana Pi is also equipped with 1GB of RAM and built-in Ethernet that can handle up to 1Gbps, which is approximately ten-times as fast as the Raspberry Pi's.
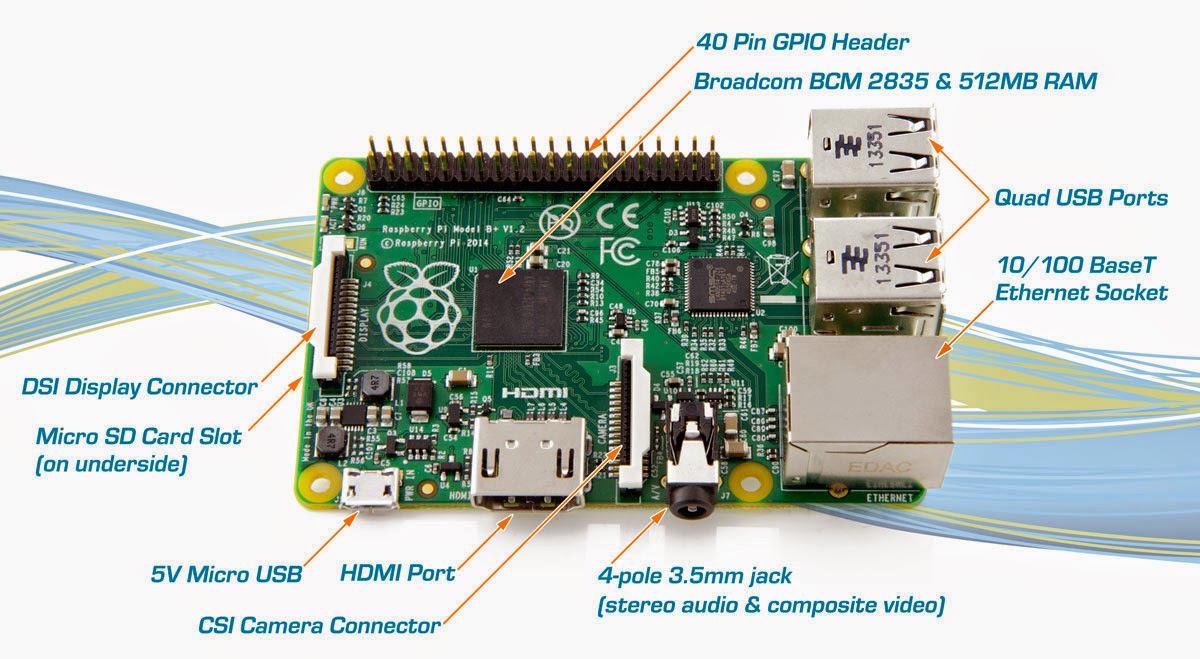
Raspberry Pi Model B+
The only area where the new Model B+ can really shine, next to the 4 x 2.0 USB ports, is the additional GPIO headers. There are now 40 compared to 26 on the Model B. The Banana Pi's GPIO layout is the same as the Raspberry Pi Model B, which makes most projects based on Raspbian and the RPi.GPIO libraries compatible with the Banana Pi.

Unfortunately the Banana uses a parallel camera interface, which means that your Raspberry Pi camera board won't connect to the Banana's CSI interface. Luckily, Lemaker is working on their own module.
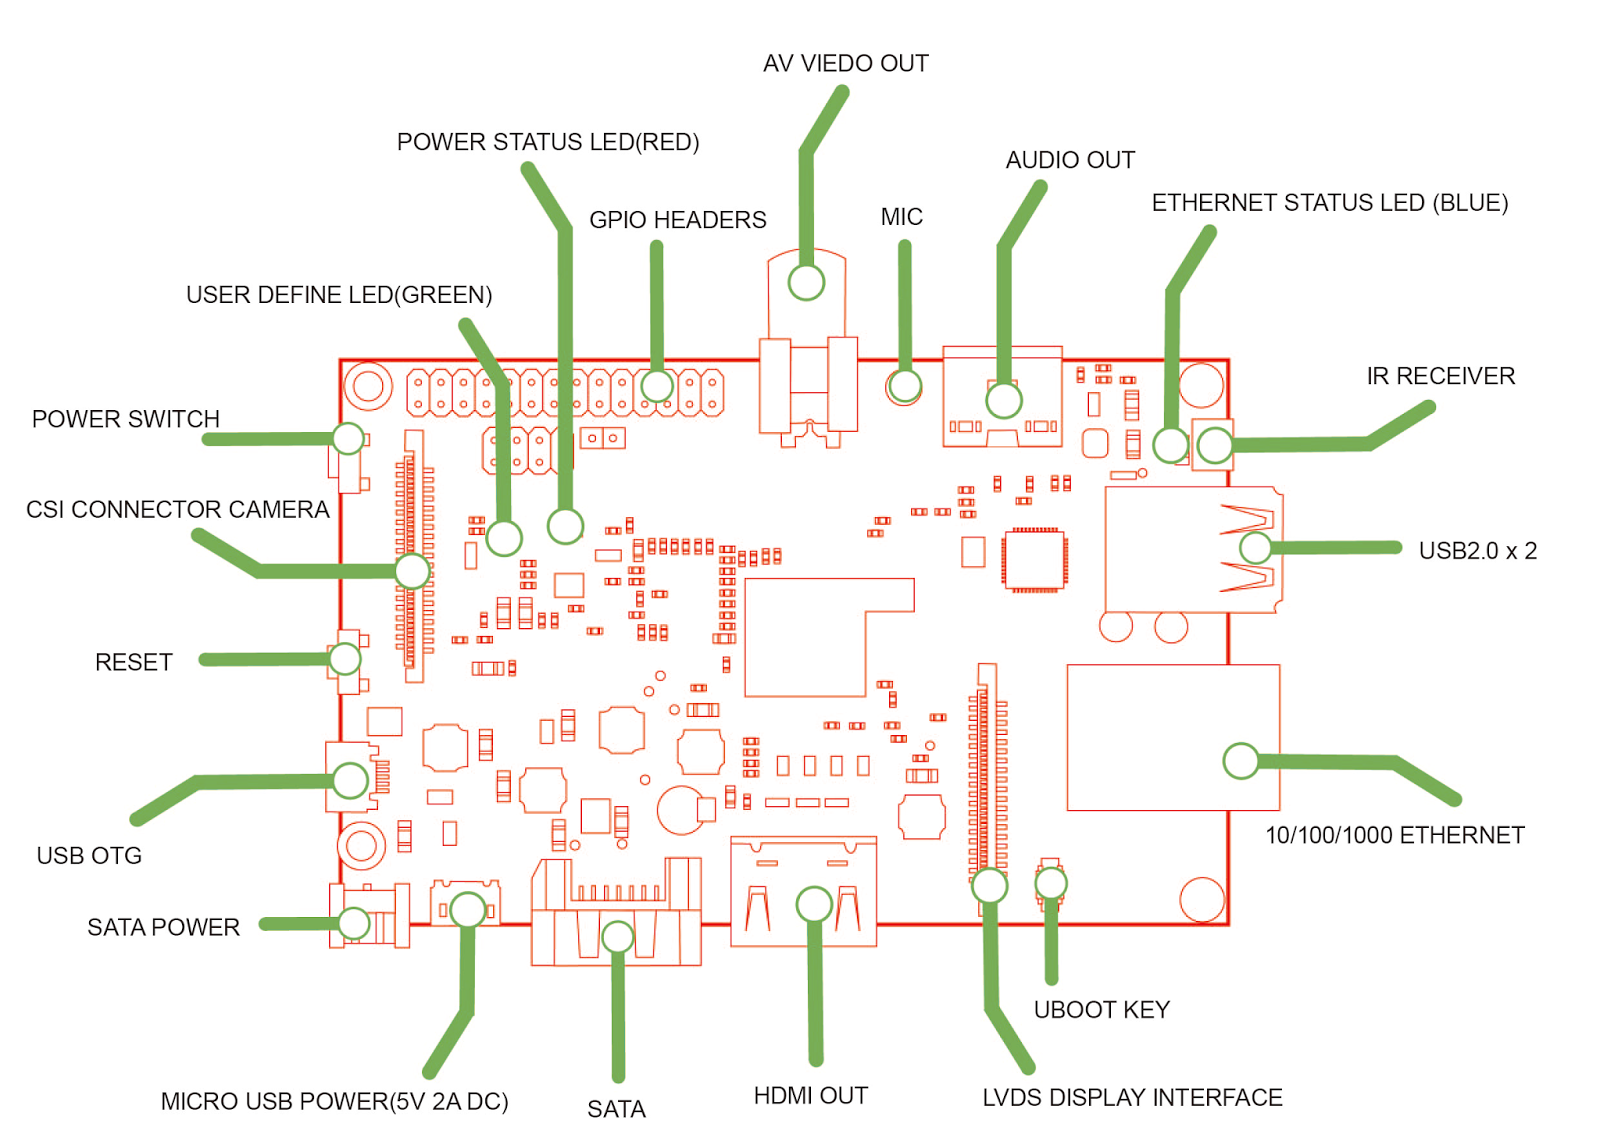
Banana Pi
Banana Pi
Additionally the Banana Pi features some interesting ''perks'': power & reset switch, an IR receiver, a microphone, a programmable LED, SATA and a LVDS display interface.

OS & first run

The Banana Pi runs Lubuntu, Raspbian, Android, Fedora, Arch Linux, OpenSuse and Scratch.  The image files can be downloaded here: http://www.lemaker.org/content-9-38-1.html

To write the image (in my case Raspbian) to a SD card, execute the following commands:
#to get the location of your card. /dev/sdb in my case
sudo fdisk -l
#to write the image
sudo bs=4M dd if=/home/user/Documents/Raspbian_For_BananaPi_v3_1.img of=/dev/sdb

Default Credentials

No need for a fancy HDMI monitor as ssh is enabled by default. Just connect the Pi via Ethernet and you are ready to go: the default credentials are userid: root, password: bananapi. To get the IP address of the Banana Pi, you can either access your router's control panel or perform a scan with nmap.
#to scan for all the devices on the network  
nmap -sn 192.168.0.1/24  
#to connect  
ssh root@192.168.0.20
First thing you might want to do is to expand the file system and disable Desktop boot.
root@lemaker raspi-config
Select "Expand Filesystem" and reboot for the changes to take effect. The next thing I did was adding a new user, deleting the default bananapi user and disabling ssh access for the root user.
#to add a new user  
sudo adduser user  
#to add a user to the sudo group  
sudo adduser user sudo  
#logout and login with your new user  
#to delete the a user account  
sudo userdel bananapi  
# to disable root ssh login  
sudo nano /etc/ssh/sshd_config  
# restart ssh   
sudo service ssh restart  
Look for "PermitRootLogin" in the /etc/ssh/sshd_config file and set it to no.

Setting Up Tight VNC Server

If you are like me and using the BPi in headless mode, you might want to setup a VNC connection.
# install tightvncserver  
sudo apt-get update && sudo apt-get install tightvncserver -y  
# start the vnc server  
vncserver :1 -geometry 800x600 -depth 24  
# now connect to the BPi with any VNC client. e.g. xtightvncviewer  
xtightvncviewer  192.168.0.20:1 
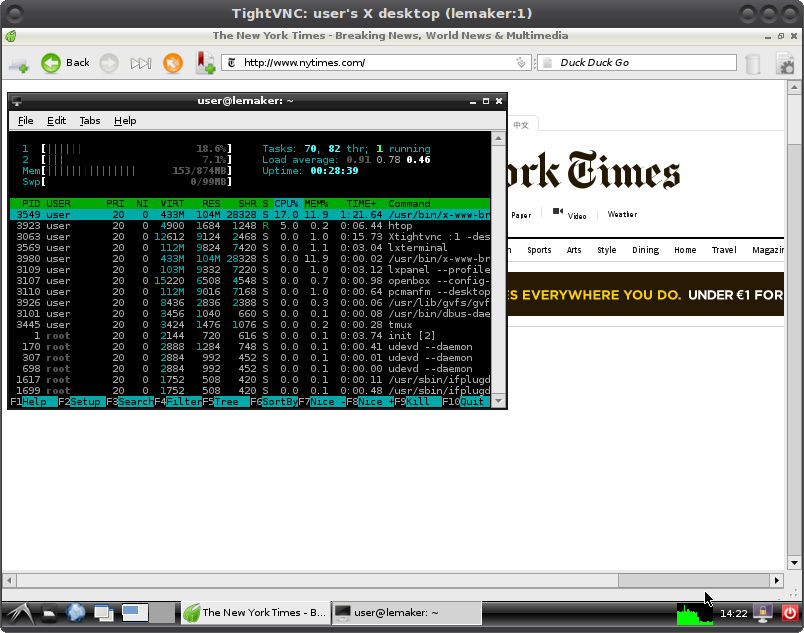
Banana Pi - Raspbian Desktop
My initial verdict after a few hours with the Banana Pi is very positive indeed. You will notice a considerable performance increase compared to your Raspberry Pi and the board's peripherals (e.g. SATA) make it ideal for many projects. As far as I am concerned I do not see any significant downsides. Sure, there is no camera module yet and some RPi extension boards won't fit the BPi,  but overall a great effort by Lemaker. I'll be back with additional tutorials.

Tutorials 

Banana Pi: Onboard, User-Definable Green Led 

Banana Pi: Temperature Sensor (DS18B20)

Banana Pi: I2C Barometric Sensor BMP085

Banana Pi: How To Install OpenMediaVault (NAS)


Comments

  1. Check out Bananian Linux!
    Minimal Debian 7 image for Banana Pi with focus on performance and security.
    More details and download: http://www.bananian.org

    ReplyDelete
  2. I have a bananpi.. I am running raspbian .. I installed libreoffice but it says "can't open display" ... has anyone had success here?

    ReplyDelete
  3. found it .. I installed it on second tty window ... alt-2 .. when I closed the startx screen and installed from the first window .. it worked .. as a matter of fact the install under x on the second window did not appear to take place at all strange..

    ReplyDelete
  4. I only see a grey screen on vmc connection. What could be the reason? (Ubuntu 14.04)

    ReplyDelete
  5. SATA disk, This is where the Banana Pi shines. Together a BPi and a SATA disk makes
    a powerful server using less than 10W. With USB peripherals, via a hub, RTL2832 TV and
    C-Media sound, very impressive.
    HKMSK, your grey screen is "root weave" not grey, from "twm" Tiny Window Manager.

    ReplyDelete
  6. I can not access to the tutorial Banana Pi: I2C Barometric Sensor BMP085 due to access rights.
    How can i access it?

    Thanks

    ReplyDelete
  7. banana pi BPI-M3: octa-core SBC.

    Eight-core CPU Allwinner A83T (Higher Performance than Raspberry pi 2)
    40 PIN compatible Rapberry Pi 2 generations
    RAM: 2G LPDDR3
    Storage : Onboard 8G eMMC flash.
    SDIO interfaces on-board wireless WIFI&Bluetooth BT4.0
    Provides CSI,DSI,Audio,2*USB ,1*OTG interfaces
    Support TF card
    Fiexible(External) WIFI&BT antenna Connection or on-board antenna
    Support SATA port

    http://forum.banana-pi.org/t/banana-pi-bpi-m3-octa-core-development-board/29
    Show less

    ReplyDelete

Post a Comment

Popular posts from this blog

OsmocomBB - Hardware and Software Setup - Tutorial (Motorola C118)

OsmocomBB is an Open Source GSM Baseband software implementation. By using the sofware on a compatible phone (e.g. Motorola C118), you are able to make and receive phone calls, send and receive SMS, etc. based on Free Software only.       Hardware PL2303HX USB Serial To RS232 TTL Chip 2.5 mm audio jack Motorola C118 (E88) This is a typical pin-out of a 2.5 mm audio jack: L (Left Signal) Tip 1 Green R (Right Signal) Ring 2 Red GND (Ground) Sleeve 3 Bare Copper You need to soldier the 2.5mm audio jack to the USB Serial To RS232 TTL Chip, whereas TxD is at the tip of the plug RxD is at the middle contact GND is the outer contact  Software Connect the phone to your PC and check if it is being recognized. dmesg | grep tty user@user:~$ dmesg | grep tty [    0.000000] console [tty0] enabled [ 6522.143379] usb 3-2: pl2303 converter now attached to ttyUSB0 To make sure everything is working, install cu and c

Scid vs PC installation guide - Ubuntu (Mint, Debian etc.)

Scid vs PC Scid vs PC is definitely the best and most comprehensive chess software for Linux.  Unfortunately I struggled quite a bit to get it up and running. Before I start: You might prefer to watch the video. Otherwise keep on reading. Open a terminal and execute the following commands sudo apt-get install auto-apt build-essential sudo auto-apt update-local sudo auto-apt update sudo auto-apt updatedb Now make sure you got both tcl8.5-dev and tk8.5-dev installed sudo apt-get install tcl8.5-dev tcl8.5 sudo apt-get install tk8.5-dev tk8.5 Some users are reporting problems on Ubuntu 14.04. sudo apt-get install tcl8.6-dev tcl8.6 sudo apt-get install tk8.6-dev tk8.6 libgcj15-dev The 'x' refers to the current release: e.g. 4.9.tgz download scid vs pc: http://sourceforge.net/projects/scidvspc/files/source/scid_vs_pc-4.9.tgz/download tar -xzf scid_vs_pc-4.xx.tgz cd scid_vs_pc-4.x sudo auto-apt run ./configure sudo auto-apt run make sudo auto-apt run make install

Automatically Reconnect WIFI (Debian, Ubuntu etc.)

The Problem For several reason I do not have access to LAN and thus have to rely on WIFI for my mining rigs. It is fine for most of the time, but the shit hits the fan, when the connection drops for one reason or another. The Solution #!/bin/bash wlan=`/sbin/ifconfig wlan1 | grep inet\ addr | wc -l` if [ $wlan -eq 0 ]; then service network-manager restart else echo WIFI IS UP fi Note: It's either wlan0 or wlan1. Check with sudo ifconfig . Save the script and make it executable. sudo chmod +x filename.sh Now there are several ways of making sure that our script is being executed every x minutes. The easiest way of accomplishing that I think is by using the command watch . sudo su watch -n 600 sh filename.sh What it does is execute our filename.sh script every 600 seconds. Or you implement a so called cron job   sudo crontab -e Add the following PATH=/usr/sbin:/usr/bin:/sbin:/bin */5 * * * * sh /home/username/filename.sh */5 * * * * means that