Monday, 10 June 2019

How to download a portion of Youtube Video with youtube-dl

First make you have both youtube-dl and ffmpeg installed:

sudo apt install youtube-dl ffmpeg


Then download a portion of your desired YouTube Video with the following command:

-ss 00:15 --> skip first 15 seconds of video
-t 00:45 --> record for 45 seconds


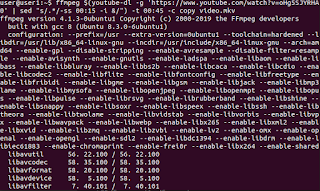
ffmpeg $(youtube-dl -g 'https://www.youtube.com/watch?v=oHg5SJYRHA0' | sed "s/.*/-ss 00:15 -i &/") -t 00:45 -c copy video.mkv


Tuesday, 28 June 2016

Darknet Links - Deep Web Links 2016

This is a list of working deep web links. To access the deep web you will need TOR. Either you can use the TOR Browser bundle or a more secure "version" of TOR to avoid being tracked online.

The list below is for educational/research purposes only.
dark net links, deep web links, silk road, tor browser


Consider leaving a comment. No CP. Thank you!

Friday, 10 June 2016

How to unblock Kickass Torrents

KickassTorrents was founded in 2008 and is the most popular torrent directory in the world. Since March 2013, major UK ISPs are blocking the website. Also, Google Chrome started blocking the website in 2015 due to "unsafe" content.

How to bypass the blocking 

Fortunately it is rather easy to get around this barrier. In March 2016 Kickass made it possible for users to access the website on the TOR network, which is an anonymous network that makes it hard for your ISP to block content.

KickassTorrents can now be accessed via lsuzvpko6w6hzpnn.onion on the TOR network. The link will not work with your "normal" web-browser. What you need is the so-called Tor Browser.

STEP 1: Download Tor Browser


Go to the Torproject homepage and download Tor browser for your operating system.

STEP 2: Open Tor Browser


And put the KickasTorrents .onion link (lsuzvpko6w6hzpnn.onion) in the address bar. DONE! You have now unblocked Kickass Torrents regardless whether your ISP blocks the website or not.

How to unblock Kickass Torrents

Wednesday, 1 June 2016

Post-Install Tips & Tricks for Ubuntu 16.04

1. Install Media Codecs

Due to legal issues Ubuntu does not come with media codecs pre-installed, which are needed to play most audio and video formats. Installing the required codecs is straightforward:
sudo apt-get install ubuntu-restricted-extras

1.1 Install unrestricted version of libavcodec 

sudo apt-get install libavcodec-extra

2. Install Java

Most likely you will only require the Java browser plugin and OpenJRE.
sudo apt install icedtea-8-plugin openjdk-8-jre

3. Adobe Flash on Ubuntu

Unfortunately Flash is still needed for many web applications.
sudo apt-get install flashplugin-installer
Alternatively you can use chromium (recommended!).
sudo apt-get install chromium-browser chromium-browser-l10n chromium-codecs-ffmpeg

4. Install Linux Graphics Drivers 

AMD users will experience a drop in performance because the AMD driver is not supported as of now (June 2016) in Ubuntu 16.04. So think twice before upgrading if you are playing games or performing GPU-intensive work.
  • 1) Open Software & Updates from the Unity Dash
  • 2) Click on the Additional Drivers tab 
  • 3) Follow on-screen instructions
software & updates ubuntu 16.04

5. Install a System Cleaner

BleachBit is an excellent open-source tool to keep your caches clean and perform some other essential housekeeping from time to time.
sudo apt-get install bleachbit
system cleaner ubuntu 16.04

Saturday, 9 April 2016

How to Install 0ad On Linux (Ubuntu, Debian etc.)

0 A.D. is a free, open-source, historical Real Time Strategy (RTS) game currently under development by Wildfire Games, a global group of volunteer game developers.

Ubuntu

sudo -s
add-apt-repository ppa:wfg/0ad
apt-get update
apt-get install 0ad

Debian

sudo -s
apt-get install 0ad

How to Run the Game 

From the command line:
0ad
How to install 0ad on Linux

Tuesday, 29 September 2015

How to connect to WiFi using command line Ubuntu, Debian etc.

Tried to upgrade to Ubuntu 15.10 Beta 2, rebooted  and my system was broken. Could not connect to LAN, so my only option was to connect to Wifi via command line to hopefully repair my system.

This is what I did.

First, open a terminal:

Ctrl-Alt-T

If you got WPA like me you need wpa_supplicant to set it up, because iw can only handle WEP.

To bring up your wireless device (most likely wlan0):
sudo -s
ifconfig wlan0 up
#now scan for available wifi networks and note the ssid of your device
iwlist wlan0 scan
In /etc/wpa_supplicant.conf we need to put our ssid and password:
nano /etc/wpa_supplicant.conf
Example config:
network={
                     ssid="ssid"
                     psk="wifi password"
}

Ctrl + A to close and save.
To connect:
sudo wpa_supplicant -B -iwlan0 -c/etc/wpa_supplicant.conf -Dwext
Open a second tab/terminal:
sudo dhclient wlan0
Your connection should now work!

Sunday, 6 September 2015

How to crack MD5 hashes with hashcat

OS: Ubuntu 15.04

There is also a GPU version (oclhashcat), but I am on my notebook so I have to use the CPU only version, which - of course - is much slower.

Download the latest hashcat version here: https://hashcat.net/hashcat/

Download a wordlist: https://crackstation.net/buy-crackstation-wordlist-password-cracking-dictionary.htm

Create a MD5 hash: E.g.: 'hello'

echo -n "hello" | md5sum
5d41402abc4b2a76b9719d911017c592

Next, extract the hashcat archive and create a .txt file with the md5 hash(es) within the folder. Also, save the wordlist in the hashcat folder.

Start hashcat. Dictionary based attack.


Command:

./hashcat-cli64.bin -n 2 -m 0 -a 8  test.txt realhuman_phill.txt

-n,   --threads=NUM                 Number of threads
-m,  --hash-type=NUM              Hash-type
-a,  --attack-mode=NUM          Attack-mode

--> use ./hashcat-cli64.bin -h to display all available options.

test.txt is the file with the md5 hash(es) and realhuman_phill.txt is the wordlist.

Wait...


hashcat will create a filed named hashcat.pot which contains successfully cracked hashes. You can display its contents with cat:

user@user:~/Desktop/hashcat-0.50$ cat '/home/user/Desktop/hashcat-0.50/hashcat.pot'
5d41402abc4b2a76b9719d911017c592:hello

There you go: hello. 

Brute-force


If you want to read about brute-force (masked) attack have a look here: http://www.unix-ninja.com/p/Exploiting_masks_in_Hashcat_for_fun_and_profit/

Quick example of a brute-force attack for the md5 hash 'cat': 5d41402abc4b2a76b9719d911017c592


./hashcat-cli64.bin -n 2 -m 0 -a 3 test.txt ?a?a?a

?a?a?a specifies to go through all character combinations exactly 3 characters long. ?l?l?l would be lower-case only:
?l = abcdefghijklmnopqrstuvwxyz
?u = ABCDEFGHIJKLMNOPQRSTUVWXYZ
?d = 0123456789
?s = !"#$%&'()*+,-./:;<=>?@[]^_`{|}~
?a = ?l?u?d?s

Friday, 28 August 2015

How to install I2P on Ubuntu

Open a terminal and enter:

sudo apt-add-repository ppa:i2p-maintainers/i2p

Update your repositories and install i2p:

sudo apt-get update
sudo apt-get install i2p

Start the I2P router (never as root):

i2prouter start

Configure your browser to connect through I2P. I'd recommend you to use Firefox.

Preferences --> Advanced --> Network tab.

In the Connections section, click on the Settings button. Click the circle next to Manual proxy configuration, enter 127.0.0.1, port 4444 in the HTTP Proxy field. Enter 127.0.0.1, port 4445 in the SSL Proxy field. Add localhost and 127.0.0.1 into the "No Proxy for" box.


Saturday, 20 June 2015

How to Register a User Name on IRC/Freenode


I am using pidgin in this guide, but any irc client should be ok.


To install pidgin.
sudo apt-get install pidgin

Add Account
Accounts --> Manage Accounts --> Add

Join a Chat
Buddies - Join a Chat

Register account
/msg NickServ REGISTER password youremail@example.com


Check your email. Follow instructions. Done!

Sunday, 31 May 2015

How to disable Unity animations in Ubuntu 13.04, 13.10, 14.04, 14.10, 15.04?


Compiz manager can be used to disable animations.


sudo apt-get install compizconfig-settings-manager

Look for Compizconfig in Unity Dash --> Effects --> Disable non-desired animations
Compizconfig Settings Manager

Sunday, 2 November 2014

Banana Pi: How To Install OpenMediaVault (NAS)

This was done on Bananian 14.09. OpenMediaVault is a simple out-of-the-box solution to set up a Network Attached Storage (NAS) and supports services such as SSH, (S)FTP, SMB/CIFS, DAAP media server, RSync, BitTorrent etc.


sudo su
wget -O - http://packages.openmediavault.org/public/archive.key | apt-key add -
apt-get install python-software-properties
apt-add-repository "deb http://packages.openmediavault.org/public kralizec main"
apt-get update
apt-get install openmediavault-keyring postfix
apt-get update
apt-get install openmediavault
omv-initsystem
reboot

Now open a browser and enter the IP address of the banana pi: e.g. http://10.0.0.x . Default user/password is admin/openmediavault.

Sunday, 19 October 2014

How To Extract Page(s) From A Single PDF File Using Command Line

PDFtk allows users to perform common pdf tasks from the command line such as merging or splitting PDF files and pages.


To install the program:
sudo apt-get install pdftk

To extract a page from an existing pdf file. For instance just the first page (A1):
pdftk A=/home/user/Desktop/cv.pdf  cat A1 output outfile.pdf

Wednesday, 8 October 2014

How To Install sqlmap on Debian (or Ubuntu)


sqlmap is an open-source pentesting tool that automates the exploitation of SQL injection flaws.

The tool makes it pretty easy for anyone with basic command line knowledge to exploit and break into databases.


Installation
sudo apt-get install git
git clone https://github.com/sqlmapproject/sqlmap.git sqlmap-dev
cd sqlmap-dev
To list available options:
python sqlmap.py -h
Fetch database names of vulnerable url:
python sqlmap.py -u www.example.com/home.php?ID=10 --dbs
Enumerate tables of a website's database (e.g.: test)
python sqlmap.py -u www.example.com/home.php?ID=10 -D test --tables
Dump all data in database (test) and table (e.g.: costumer_data)
python sqlmap.py -u www.example.com/home.php?ID=10 -D test -T costumer_data --dump
More examples are available here: https://gist.github.com/stamparm/5335217

Friday, 19 September 2014

Banana Pi: I2C Barometric Sensor BMP085


Wiring

---> 3.3 volts - to vcc on board
---> ground - to gnd on board
---> SDA - to sda on board
---> SLC - to scl on board


Banana Pi - I2C Barometer BMP085
Wiring, BMP085

Locating the sensor

root@lemaker:~# ls -l /dev/i2c*
crw-rw---T 1 root i2c 89, 0 Sep 19 14:43 /dev/i2c-0
crw-rw---T 1 root i2c 89, 1 Sep 19 14:43 /dev/i2c-1
crw-rw---T 1 root i2c 89, 2 Sep 19 14:43 /dev/i2c-2
crw-rw---T 1 root i2c 89, 3 Sep 19 14:43 /dev/i2c-3
crw-rw---T 1 root i2c 89, 4 Sep 19 14:43 /dev/i2c-4
As you can see there are 5 I2C buses. With the i2cdetect tool we are looking for the 0x77 address, which is the BMP085.
# -y 0, -y 1 etc
sudo i2cdetect -y 2
We are using the  Adafruit BMP Python Library to access the sensor.
sudo apt-get install git build-essential python-dev python-smbus
git clone https://github.com/adafruit/Adafruit_Python_BMP.git
cd Adafruit_Python_BMP
sudo python setup.py install
There are some example scripts in the examples folder.
cd examples

# we need to change the bus number
nano simpletest.py
#uncomment sensor = BMP085.BMP085(busnum=2)
#and comment #sensor = BMP085.BMP085()

#run code
sudo python simpletest.py

#sample output
Temp = 23.00 *C
Pressure = 97607.00 Pa
Altitude = 313.47 m
Sealevel Pressure = 97607.00 Pa

Wednesday, 17 September 2014

Banana Pi: Temperature Sensor (DS18B20) - Tutorial


Requirements

    --> Banana Pi running Raspbian for Banana Pi
    --> Breadboard
    --> Jumper Wires
    --> DS18b20
    --> 4.7K Ohm resistor
    --> Breakout cobbler


      Hardware Setup

      Refer to the graphic for the correct wiring. Make sure the Banana Pi is switched off to prevent any possible damage.

      Banana Pi Temperature Sensor - DS18B20

      Software Setup

      Double check the wiring and boot the device. In order to be able to access the temperature data, we need to make some minor adjustments to the script.bin file, which is a binary configuration file used by Allwinner SOC.
      sudo apt-get install git
      git clone https://github.com/linux-sunxi/sunxi-tools
      cd sunxi-tools
      make
      
      #location of the script.bin file
      cd /boot/bananapi/
      
      #get the fex file
      sudo /home/bananapi/sunxi-tools/bin2fex script.bin bananapi.fex
      
      #edit the fex file
      sudo nano bananapi.fex
      
      #add the following at the end, save (CTRL + O) and close
      [w1_para]
      gpio = 4
      
      #.fex back to .bin
      sudo /home/bananapi/sunxi-tools/fex2bin bananapi.fex script.bin
      
      sudo reboot

      Reading raw data from the sensor

      After successfully rebooting your device, you will notice that /sys/bus/w1/devices is no longer empty.
      bananapi@lemaker ~ $ cd /sys/bus/w1/devices
      bananapi@lemaker /sys/bus/w1/devices $ ls
      28-000006203041  w1_bus_master1
      bananapi@lemaker /sys/bus/w1/devices $ cd 28-000006203041
      bananapi@lemaker /sys/bus/w1/devices/28-000006203041 $ ls
      driver  id  name  power  subsystem  uevent  w1_slave
      bananapi@lemaker /sys/bus/w1/devices/28-000006203041 $ cat w1_slave
      5e 01 4b 46 7f ff 02 10 8d : crc=8d YES
      5e 01 4b 46 7f ff 02 10 8d t=21875
      t=21875 is the number we are looking for. E.g.: 21.9 degree Celsius (°C) in my case.

      Banana Pi Temperature Sensor (DS18B20)
      my setup

      Tuesday, 16 September 2014

      Building Wireshark from Source - Linux (Debian 7.6)


      OS: Debian GNU/Linux 7.6 (wheezy)


      Latest releases can be found here: https://www.wireshark.org/download.html
      wget https://1.eu.dl.wireshark.org/src/wireshark-1.12.0.tar.bz2
      tar xaf wireshark-1.12.0.tar.bz2
      cd wireshark-1.12.0
      #could be that you need to install libgtk-3-dev before compiling
      sudo apt-get install libgtk-3-dev 
      #to compile
      ./configure
      make
      #now run it
      sudo ./wireshark
      Building Wireshark from source under Linux (Debian 7.6)

      Saturday, 13 September 2014

      OsmocomBB - Hardware and Software Setup - Tutorial (Motorola C118)

      OsmocomBB is an Open Source GSM Baseband software implementation. By using the sofware on a compatible phone (e.g. Motorola C118), you are able to make and receive phone calls, send and receive SMS, etc. based on Free Software only.


      Hardware

      • PL2303HX USB Serial To RS232 TTL Chip
      • 2.5 mm audio jack
      • Motorola C118 (E88)
      This is a typical pin-out of a 2.5 mm audio jack:

      L (Left Signal) Tip 1 Green
      R (Right Signal) Ring 2 Red
      GND (Ground) Sleeve 3 Bare Copper

      You need to soldier the 2.5mm audio jack to the USB Serial To RS232 TTL Chip, whereas
      • TxD is at the tip of the plug
      • RxD is at the middle contact
      • GND is the outer contact 
      2.5mm audio jack to the USB Serial To RS232 TTL Chip Osmocom

      Software

      Connect the phone to your PC and check if it is being recognized.
      dmesg | grep tty
      user@user:~$ dmesg | grep tty
      [    0.000000] console [tty0] enabled
      [ 6522.143379] usb 3-2: pl2303 converter now attached to ttyUSB0
      To make sure everything is working, install cu and connect at 115200 baud. Permissions need to be set correctly, otherwise you will run into this error: "Cannot open /dev/ttyUSB0: Permission denied".
      sudo adduser user dialout
      sudo chmod a+rw /dev/ttyUSB0
      sudo cu -l /dev/ttyUSB0 -s 115200
      Assuming the phone is switched off, press the power button and cu should display fmttool erro, which means you are ready to go!

      Compiling OsmocomBB

      Compiling GNU ARM toolchain

      Ensure you add the path of arm-elf-gcc using export (check in shell: arm-elf-gcc). This is absolutely vital as failure to do so will yield you errors when trying to compile osmocom later on.  
      mkdir gnuarm
      cd gnuarm
      wget  http://bb.osmocom.org/trac/raw-attachment/wiki/GnuArmToolchain/gnu-arm-build.2.sh
      chmod +x gnu-arm-build.2.sh
      
      sudo apt-get install build-essential libgmp3-dev libmpfr-dev libx11-6 libx11-dev texinfo flex bison libncurses5 \
       libncurses5-dbg libncurses5-dev libncursesw5 libncursesw5-dbg libpcsclite-dev libncursesw5-dev zlibc zlib1g-dev libmpfr4 libmpc-dev aptitude
      
      sudo aptitude install libtool shtool automake autoconf git-core pkg-config make gcc
      
      mkdir build install src
      cd src/
      wget http://ftp.gnu.org/gnu/gcc/gcc-4.5.2/gcc-4.5.2.tar.bz2
      wget http://ftp.gnu.org/gnu/binutils/binutils-2.21.1a.tar.bz2
      wget ftp://sources.redhat.com/pub/newlib/newlib-1.19.0.tar.gz
      cd ..
      ./gnu-arm-build.2.sh
      
      export PATH=$PATH:/home/user/gnuarm/install/bin

      Compiling libosmocore

      git clone git://git.osmocom.org/libosmocore.git
      cd libosmocore/
      autoreconf -i
      ./configure
      make
      sudo make install

      Compiling osmocomBB

      git clone git://git.osmocom.org/osmocom-bb.git
      cd osmocom-bb
      git pull --rebase
      cd src
      make

      OsmocomBB Hello world! 

      Plug everything in, switch phone off, run command and press the phone's power button.
      cd ~/osmocom-bb/src/host/osmocon/
      ./osmocon -p /dev/ttyUSB0 -m c123xor ../../target/firmware/board/compal_e88/hello_world.compalram.bin
      Osmocom Motorola C118

      Loading RSSI 

      sudo ./osmocon -d tr -p /dev/ttyUSB0 -m c123xor -c ../../target/firmware/board/compal_e88/rssi.highram.bin
      OsmocomBB RSSI

      Friday, 15 August 2014

      Banana Pi: Onboard, User-Definable Green Led

      As you may have noticed the BPi has a green LED, which starts blinking as soon as the Pi is powered on: i.e. as soon as something happens with the SD card. It is possible to program the behavior of the LED such as switching it off.

      To list the available options open a terminal and enter cat /sys/class/leds/green:ph24:led1/trigger. The default value is heartbeat. If you want to permanently switch it off the trigger needs to be set to none.
      user@lemaker ~ $ cat /sys/class/leds/green:ph24:led1/trigger  
      none battery-charging-or-full battery-charging battery-full battery-charging-blink-full-solid ac-online usb-online mmc0 timer [heartbeat] backlight gpio cpu0 cpu1 default-on  
      user@lemaker ~ $ sudo su  
      root@lemaker:~# echo none >  /sys/class/leds/green:ph24:led1/trigger
      The LED may be manually turned on and off using the brightness file. The minimum is 0 (i.e. off), and the maximum is 255. To switch it on:
      root@lemaker:~# echo 1 >  /sys/class/leds/green:ph24:led1/brightness 

      Let it blink

      #!/bin/bash
      
      echo none >  /sys/class/leds/green:ph24:led1/trigger
      while true; do
      echo 1 >  /sys/class/leds/green:ph24:led1/brightness
      sleep 1
      echo 0 >  /sys/class/leds/green:ph24:led1/brightness
      sleep 1
      done
      Make sure to run the script as root - e.g. sudo sh led.sh. 

      Saturday, 9 August 2014

      Banana Pi - Raspberry Pi Upgraded


      Given that I finally received my Banana Pi, it is time for a little review of the Chinese Raspberry Pi "competitor". Before I tell you about my first experiences with the board, let's have a quick look at its hardware specs and how they compare to the newly released Raspberry Model B +.


      Hardware


      The first thing that sticks out is the Banana Pi's much faster dual-core, Cortex-A7-based Allwinner A20 system-on-chip running at 1GHz, which definitely beats the Raspberry's "well-known" 700MHz, ARM11-based Broadcom BCM2835 processor.

      The Banana Pi is also equipped with 1GB of RAM and built-in Ethernet that can handle up to 1Gbps, which is approximately ten-times as fast as the Raspberry Pi's.
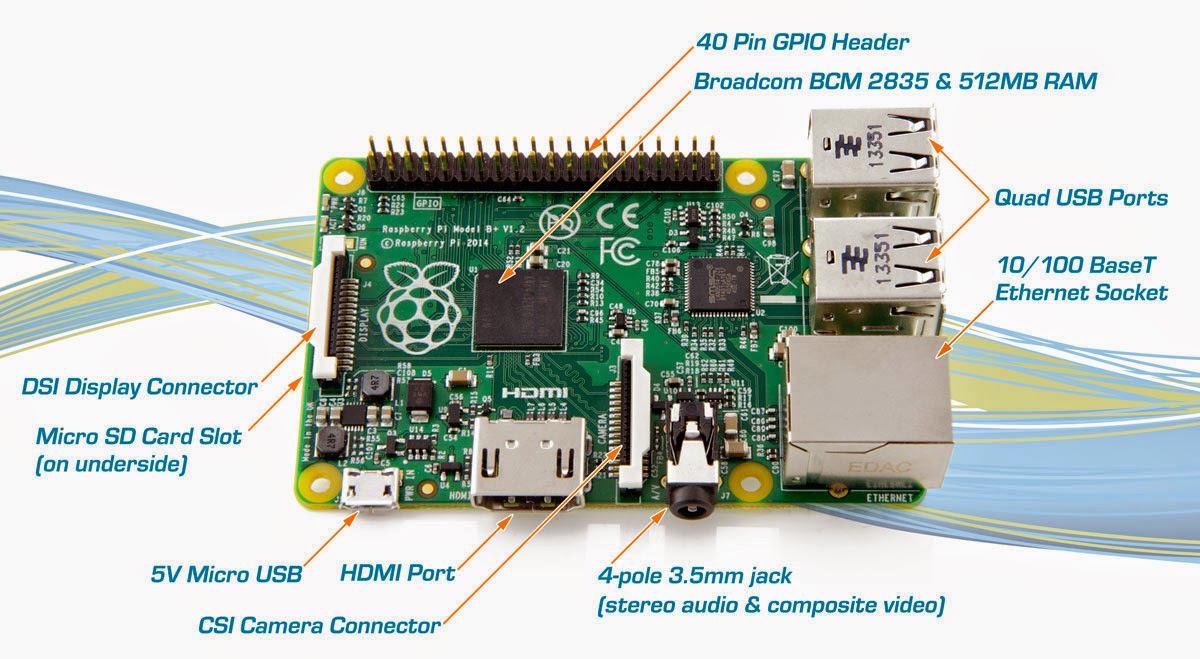
      Raspberry Pi Model B+
      Raspberry Pi Model B+
      The only area where the new Model B+ can really shine, next to the 4 x 2.0 USB ports, is the additional GPIO headers. There are now 40 compared to 26 on the Model B. The Banana Pi's GPIO layout is the same as the Raspberry Pi Model B, which makes most projects based on Raspbian and the RPi.GPIO libraries compatible with the Banana Pi.

      Unfortunately the Banana uses a parallel camera interface, which means that your Raspberry Pi camera board won't connect to the Banana's CSI interface. Luckily, Lemaker is working on their own module.
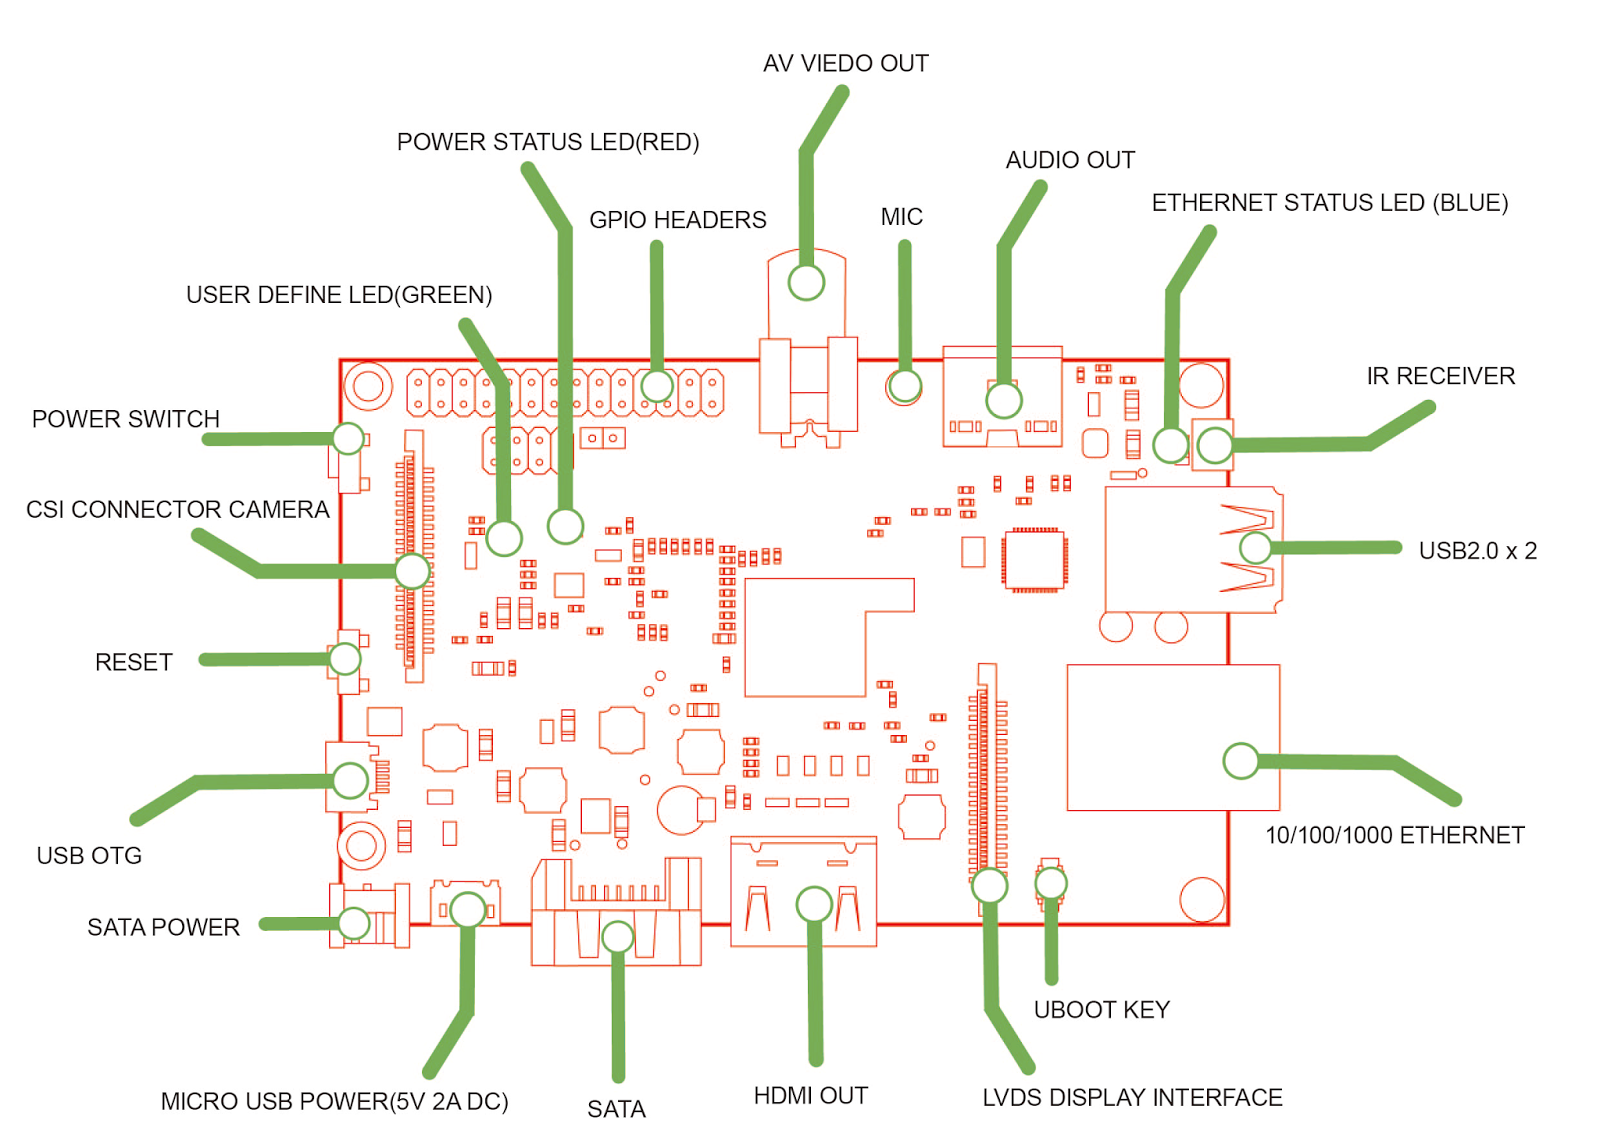
      Banana Pi
      Banana Pi
      Additionally the Banana Pi features some interesting ''perks'': power & reset switch, an IR receiver, a microphone, a programmable LED, SATA and a LVDS display interface.

      OS & first run

      The Banana Pi runs Lubuntu, Raspbian, Android, Fedora, Arch Linux, OpenSuse and Scratch.  The image files can be downloaded here: http://www.lemaker.org/content-9-38-1.html

      To write the image (in my case Raspbian) to a SD card, execute the following commands:
      #to get the location of your card. /dev/sdb in my case
      sudo fdisk -l
      #to write the image
      sudo bs=4M dd if=/home/user/Documents/Raspbian_For_BananaPi_v3_1.img of=/dev/sdb

      Default Credentials

      No need for a fancy HDMI monitor as ssh is enabled by default. Just connect the Pi via Ethernet and you are ready to go: the default credentials are userid: root, password: bananapi. To get the IP address of the Banana Pi, you can either access your router's control panel or perform a scan with nmap.
      #to scan for all the devices on the network  
      nmap -sn 192.168.0.1/24  
      #to connect  
      ssh root@192.168.0.20
      First thing you might want to do is to expand the file system and disable Desktop boot.
      root@lemaker raspi-config
      Select "Expand Filesystem" and reboot for the changes to take effect. The next thing I did was adding a new user, deleting the default bananapi user and disabling ssh access for the root user.
      #to add a new user  
      sudo adduser user  
      #to add a user to the sudo group  
      sudo adduser user sudo  
      #logout and login with your new user  
      #to delete the a user account  
      sudo userdel bananapi  
      # to disable root ssh login  
      sudo nano /etc/ssh/sshd_config  
      # restart ssh   
      sudo service ssh restart  
      
      Look for "PermitRootLogin" in the /etc/ssh/sshd_config file and set it to no.

      Setting Up Tight VNC Server

      If you are like me and using the BPi in headless mode, you might want to setup a VNC connection.
      # install tightvncserver  
      sudo apt-get update && sudo apt-get install tightvncserver -y  
      # start the vnc server  
      vncserver :1 -geometry 800x600 -depth 24  
      # now connect to the BPi with any VNC client. e.g. xtightvncviewer  
      xtightvncviewer  192.168.0.20:1 
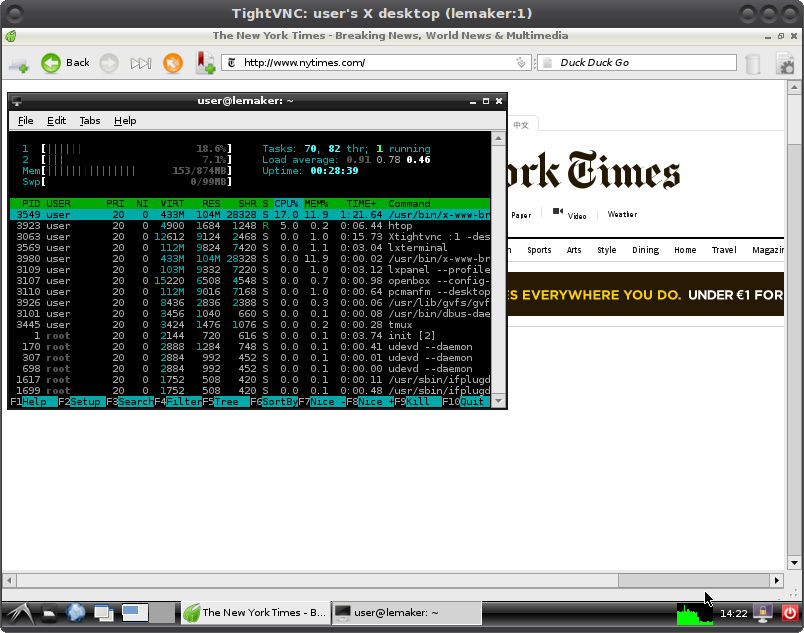
      Banana Pi - Raspbian Desktop
      Banana Pi - Raspbian Desktop
      My initial verdict after a few hours with the Banana Pi is very positive indeed. You will notice a considerable performance increase compared to your Raspberry Pi and the board's peripherals (e.g. SATA) make it ideal for many projects. As far as I am concerned I do not see any significant downsides. Sure, there is no camera module yet and some RPi extension boards won't fit the BPi,  but overall a great effort by Lemaker. I'll be back with additional tutorials.

      Tutorials 

      Banana Pi: Onboard, User-Definable Green Led 

      Banana Pi: Temperature Sensor (DS18B20)

      Banana Pi: I2C Barometric Sensor BMP085

      Banana Pi: How To Install OpenMediaVault (NAS)


      Friday, 1 August 2014

      How To Install i2p On Debian Wheezy

      Steps should be performed with root access: i.e. sudo su

      Add the following lines to /etc/apt/sources.list.d/i2p.list

      1. nano /etc/apt/sources.list.d/i2p.list  
      2.   
      3. deb http://deb.i2p2.no/ stable main  
      4. deb-src http://deb.i2p2.no/ stable main 
      Download the key used to sign the repository and add it to apt
      1. apt-key add debian-repo.pub  
      Update repositories and install i2p
      1. apt-get update  
      2. apt-get install i2p i2p-keyring  
      Run i2p (NEVER AS ROOT!)
      1. i2prouter start  
      How To Install I2P On Debian Wheezy

      How to download a portion of Youtube Video with youtube-dl

      First make you have both youtube-dl and ffmpeg installed: sudo apt install youtube-dl ffmpeg Then download a portion of your desired...